Magically Delicious Pie

DSC00280.jpg

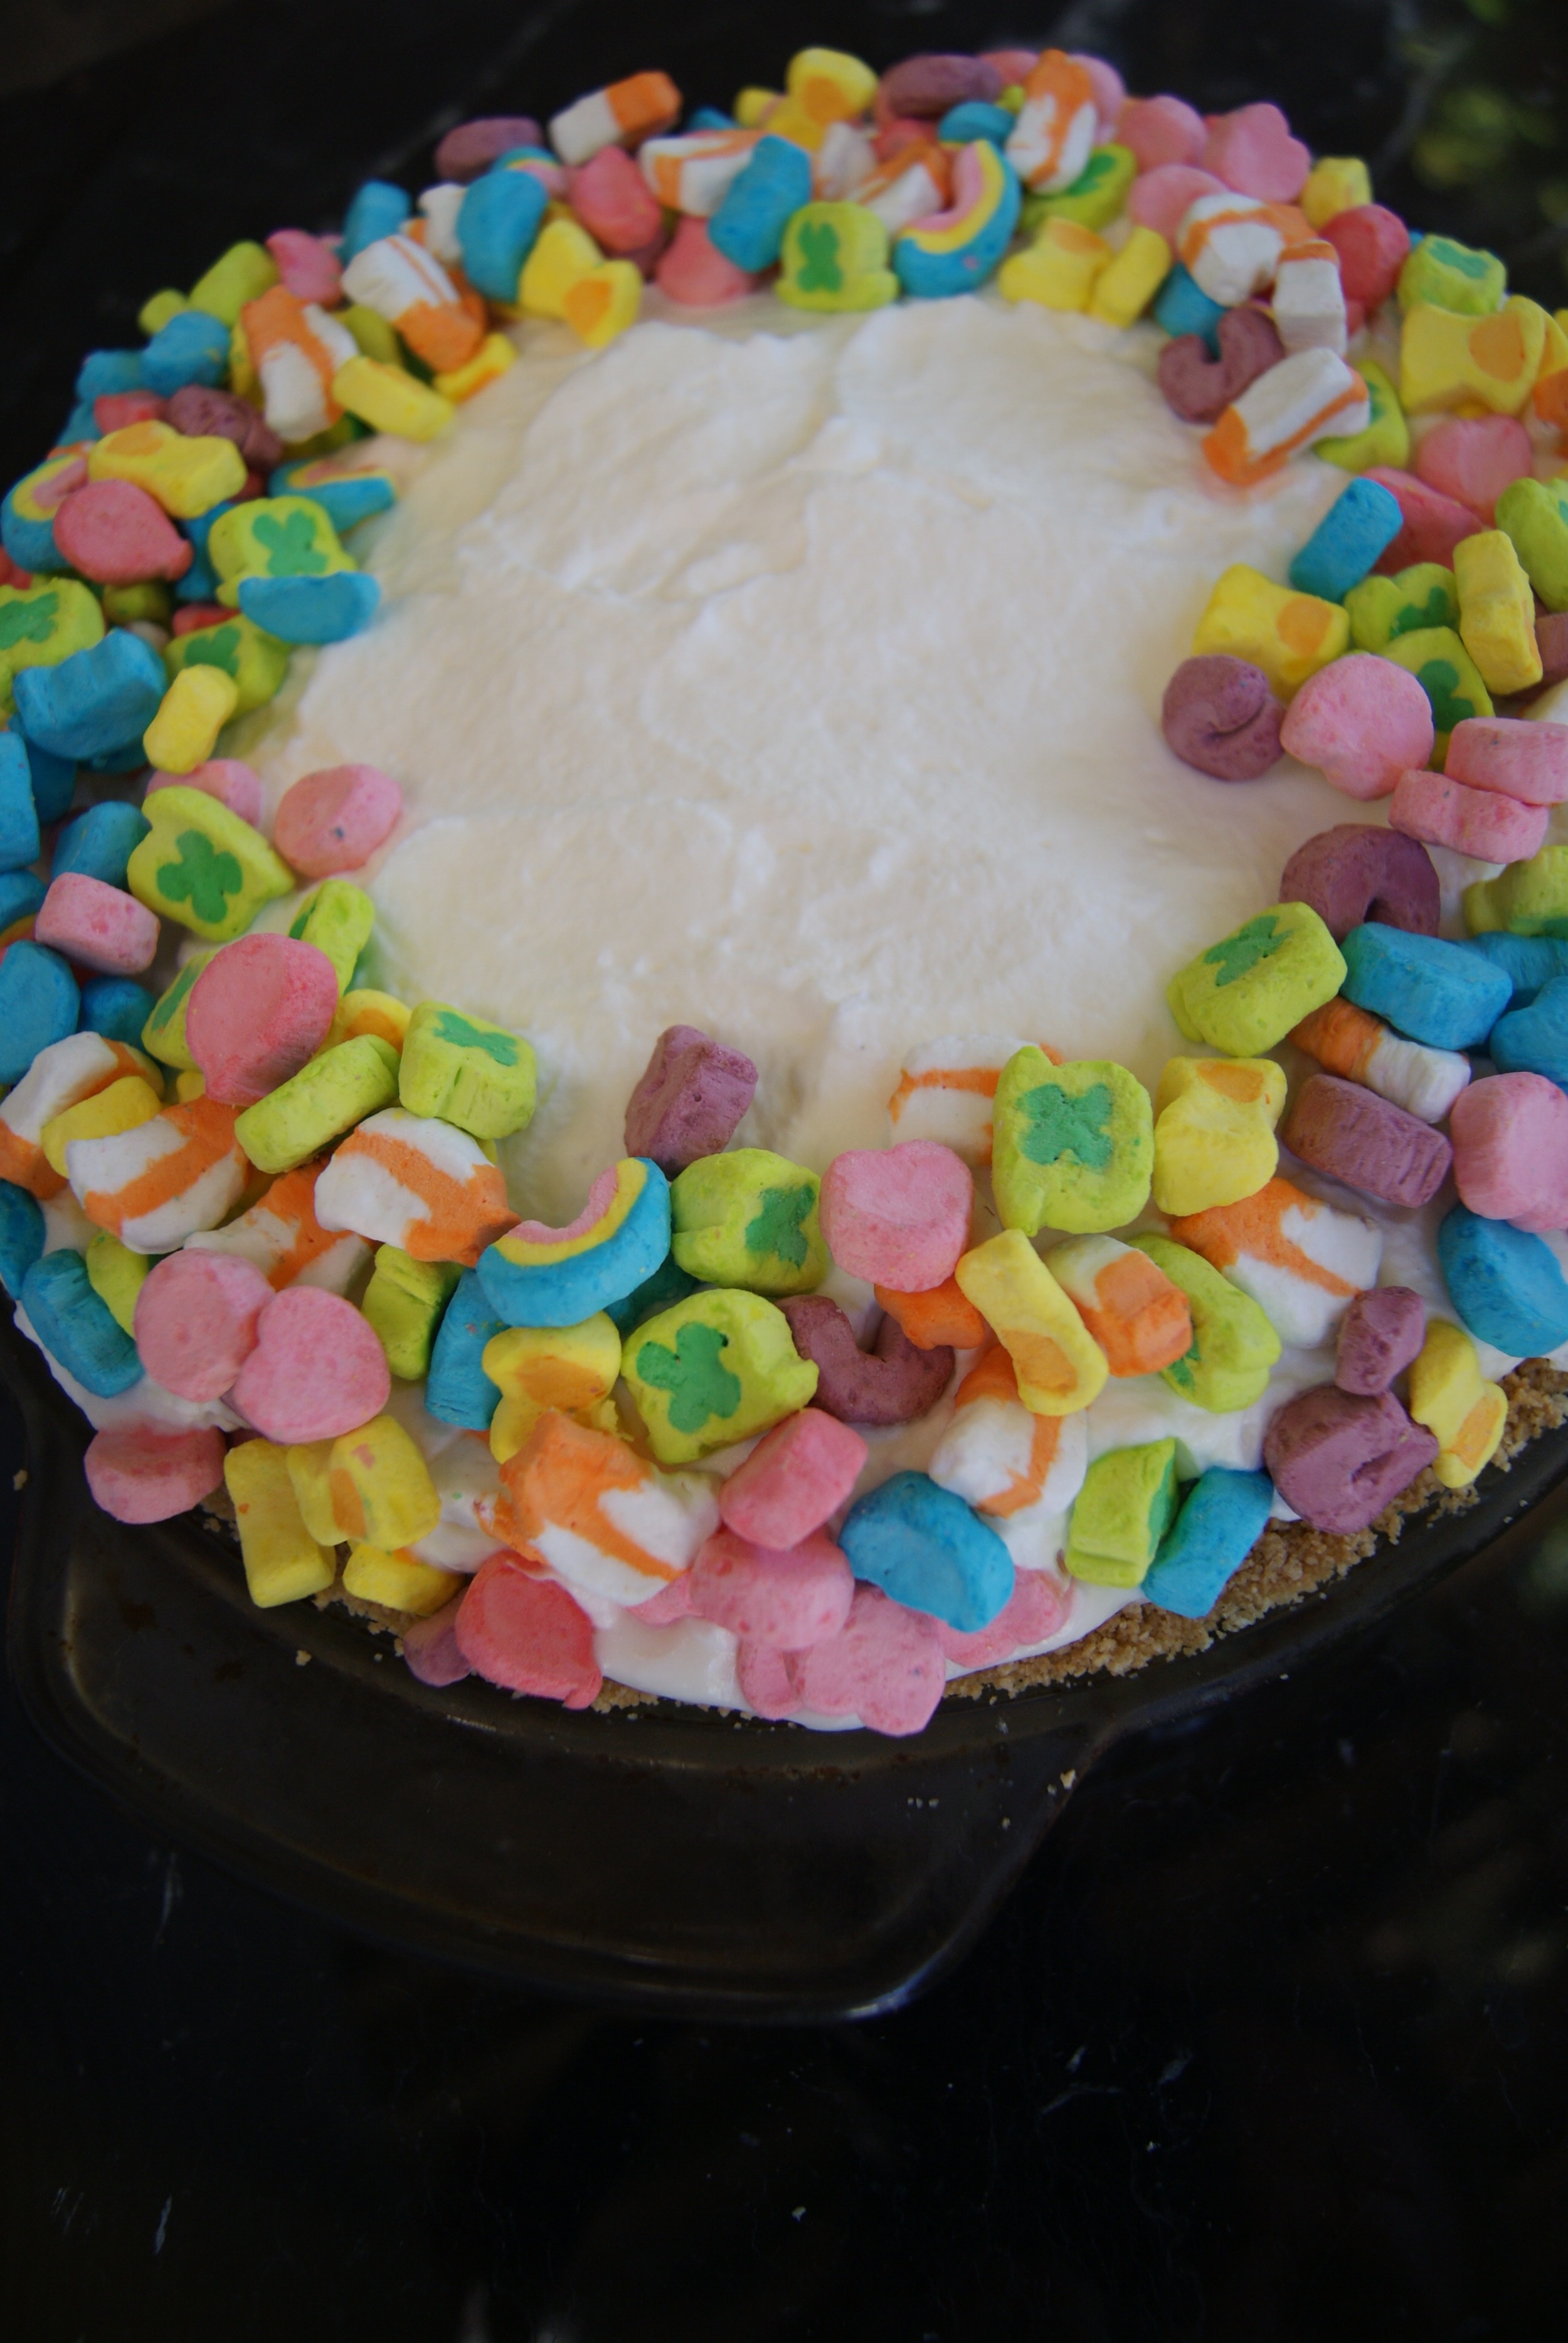
As children, we spent part of our summer vacations on Lake Erie in Ohio visiting our Grandma C and many aunts uncles and cousins. Those weeks were the highlight of summer, spending the hot and humid days swimming in the lake, walking down the street to buy candy at the corner shop, and convincing the adults to drive us to our favorite drive-in restaurant, White Turkey, AT LEAST once a day. Another perk of being at Grandma's was that she always had sugary sweet cereals and treats in her house during our visits. All the cousins would come down stairs each morning and pour a bowl of their favorite cereal and plan the adventures to be had that day. Our personal favorite was a big bowl of Lucky Charms (We affectionately called them Monkey Germs lol). This pie is a frozen take on our beloved cereal. This recipe transports us back to Grandmas house by the lake. We can almost feel the warm breeze drifting off the lakeshore and hear the distant rumble of a coming thunderstorm. 

xxx Ivy & Eve

Adapted from The Slow Roasted Italian.

Makes one pie with 12 small slices.

Ingredients:

  • 1 box Lucky Charms Cereal

  • 8 tablespoons melted butter

  • One 7 oz. jar of marshmallow fluff (about 1 1/2 cups)

  • 8 oz. cream cheese, softened

  • 2 cups heavy cream

  • 1/4 cup powdered sugar

Directions:

  1. Preheat the oven to 400 degrees. 

  2. Separate the cereal and the marshmallows into two separate bowls.

  3. Melt the butter in a small bowl.

  4. Add 4 cups of the cereal to the bowl of a food processor. Pulse until your mixture is crumbs. Pour in the melted butter and pulse until all the crumbs are moistened.

  5. Pour the crumbs into a 9 inch pie pan and press mixture on the bottom and around the sides to form the pie crust.

  6. Place the crust in the oven and bake for 5-7 minutes until it is slightly golden. Then place the crust in the freezer to cool while you prepare the filling.

  7.  Whip the heavy cream with a mixer until you can starts to thicken and then add powdered sugar. Whip until stiff peaks form. Place the whipped cream in the refrigerator while you make the other mixture.

  8. Beat the cream cheese and marshmallow fluff with an electric mixer until light and fluffy (about 5 minutes). Fold in 1/2 of the whipped cream and a 1/2 cup of the Lucky Charms marshmallows. Pour the mix into the chilled pie crust and smooth with a spatula. Pour remaining whipped cream over top and sprinkle the remaining marshmallows around the edge of the pie. Freeze for at least 3 hours. When it is time to serve, take it out of the freezer and let soften for 10 minutes.

  9. Slice and serve! 

Watermelon Lime Basil Popsicles

Midsummer in the Valley brings high temps and if you're lucky, long days spent by the pool. This past weekend was no exception, and we decided to concoct a popsicle recipe for something tasty and refreshing. Watermelon was our choice for the base, light, refreshing, and crisp. We then picked a lime to add some zing, ending with a little basil. Summer fruits are naturally sweet so we didn't use any added sugar making them surprisingly healthy. We used our Zoku Quick Pop Maker which freezes popsicles in as little as 15 minutes! We ended up eating the whole batch before we even thought about cleaning up! We think these little pops turned out perfectly. They are refreshing and ready for a poolside staycation!

xxx Ivy & Eve


Makes 6 Zoku quick pops or 6 regular popsicles.

Ingredients:

  • Diced fresh seedless watermelon
  • 1 Lime (juice)
  • 2-3 Basil leaves

Directions:

  1. Dice watermelon into cubes, place in blender. Blend till you make around 2 cups liquid. 
  2. Squeeze 1 lime into watermelon slurry. blend for 30 seconds.
  3. Place 2-3 leaves of basil in blender. (amount depends on preference). Blend till pieces are small but not tiny. (size is also up to preference).
  4. Pour mixture into popsicle molds. We use the Zoku Quick Pop Maker.
  5. If you use the Zoku Quick Pop Maker let freeze according to directions, making 2 batches for a total of 6 pops. 
  6. If you use a regular popsicle mold, place in freezer for a few hours until frozen. 
  7. Serve or Store!

Nectarine and Burrata Salad

We are lucky that our hometown has fantastic farmers markets year-round. We try to shop them as often as possible, buying the seasons freshest produce and supporting the small local farmers. In the summer, we love to pick up nectarines and other summer stone fruits to use in recipes and to eat by themselves. Nectarine and burrata salad is one of our favorite summer dishes. You can use white or yellow nectarines, or some of each, which we like to do! It is perfect for serving as an appetizer or alongside something light like grilled chicken. To make this dish more substantial, you can serve it on a bed of arugula with fresh baguette on the side.

xxx Ivy & Eve

Serves 4 as a side dish, 2 as a main.

Ingredients

  • 3 large nectarines halved (4 if small), pitted, and sliced into 1/2 inch slices

  • One burrata cheese ball (we got ours at Whole Foods)

  • Olive oil for drizzling

  • 1 tablespoon of tarragon leaves, stems removed and roughly chopped

  • Flaky sea salt

  • Pepper

  • Arugula (optional)

  • Freshly sliced baguette (optional)

Directions

  1. If using arugula, arrange it on a large platter.

  2. Add the nectarine slices neatly - slightly overlapping the slices in the middle of the platter (or on the arugula)

  3. Slice the burrata in half and then tear the cheese into smaller pieces (it will be messy and gooey) onto the slices of nectarines. YUM!

  4. Sprinkle the tarragon leaves on the top.

  5. Season with salt and pepper.

  6. Drizzle with olive oil.

  7. Serve with sliced baguette. (optional)

  8. Enjoy!

Biscuit Roses de Reims- Cookies You Dip in Champagne!

During our recent trip to Reims (see full post here), the champagne capital of the world, we passed Maison Fossier, whose windows were filled with adorable tins and bags filled with rectangular pink biscuits. Naturally, we had to go inside the shop to see what these little pink biscuits were all about. Walking in, we were immediately surrounded by the warmth and delicate sweet scent of sugar and vanilla. Best of all, there was PINK everywhere! We sampled one of these pink beauties, and with one bite, we were in love! They have the texture of an un-soaked ladyfinger and are subtly sweet with a touch of vanilla—a perfect accompaniment for champagne.

These biscuits were invented in the 1690s by bakers in Reims, who wanted to make something that could be made using the heat from their ovens between baking batches of bread. The shop, Maison Fossier, has been making Biscuit Roses de Reims since it opened in 1756 and now can be found throughout France and around the world. These biscuits were even served during the Coronation of Louis XVI at Reims, and Maison Fossier became the biscuit maker for the royal family.

You are supposed to serve these biscuits with champagne (preferably champagne from Reims), and they are made to be dipped into the champagne to bring out the subtle flavors of the cookies. Of course, you don't have to sell us on anything that involves champagne, so we bought a few tins as gifts and a bag for us to enjoy on our trip. Once we were home, we missed having these cute and crunchy biscuits and decided to make them ourselves. We found the original recipe on the official website for France, so we decided not to alter it much because if it is on the official website for France, it must be good.

xxx Ivy & Eve

Adapted from the recipe on France.fr.

Makes about 45 cookies.

Ingredients

  • 4 large eggs at room temperature (separate the yolks from the whites)

  • 1 tsp vanilla extract

  • 1 cup sugar

  • 1 1/2 cups flour

  • 1/3 cup cornstarch

  • 1 tsp baking powder

  • 6-8 drops of red food coloring (depending on how pink you want them)

  • Powdered (confectioner's) sugar for dusting the cookies

  • Pastry bag with a 1/4-inch smooth tip

Directions

  1. Preheat the oven to 275°F. Mix the yolks, sugar, and vanilla in a bowl using a hand blender with a whisk attachment, on increasing speed over 5-6 minutes. Beat in 2 of the egg whites for another 2 minutes. Beat in the remaining 2 egg whites and the food coloring for an additional 5 minutes until the mixture begins to form stiff peaks.

  2. Sift the flour, cornstarch, and baking powder into the bowl, folding in gently with a spatula. You want a final result that is smooth and uniform in color. Scrape it into the pastry bag.

  3. Cover a baking sheet with parchment paper and spray with non-stick baking spray. Squeeze out strips of the mixture that are 1/4-inch wide (about as wide as your finger) and about 3 inches long and 1/4-1/2 inches apart. Sprinkle with powdered sugar and bake for 10-15 minutes, until a toothpick comes out clean. (You don't want the biscuits to start browning though, or else they won't be pink!) Take the biscuits out, sprinkle them with more powdered sugar, and place them back in the oven for another 10-15 minutes.

  4. When you take them out, quickly cut the biscuits' edges so that you have even rectangles. Do this before they cool, or else they become rather difficult to cut. If they cool before you finish, you can place them back in the oven for a few minutes to soften. If once they cool, they aren't completely crunchy, you can always but them back in the oven at 200°F and dry them out for about 20 minutes.

  5. Serve with champagne, dip, and enjoy!

Our dog Pearl and cat Fatty Pants loved them too!

Our dog Pearl and cat Fatty Pants loved them too!

Father's Day Float!

Just in time for Father's Day, we decided to share one of our new favorite recipes that is "Dad approved". We discovered this tasty delight at one of our favorite local coffee shops, Crema, in Pacific Grove. Ivy was a little wiry of this concoction when Eve ordered it from the menu, but after taking a sip herself, Ivy decided it was delicious. We didn't get this recipe from Crema, but it tastes pretty darn close! Their espresso shot was super smooth (which was delicious), whereas our espresso was a bit more intense. It totally depends on your preferences. Its fairly simple to make however we recommend trying it out at Crema yourself first. We made this for our Dad before we left for Europe as an early Father’s Day treat. We think any Dad (or beer lover) will love this sweet treat!

xxx Ivy & Eve

Makes two floats.

Ingredients

  • 1 bottle Samuel Smith's Organic Chocolate Stout beer (You can find it at most beer shops or at Total Wine & More.)

  • Good Chocolate syrup

  • 2 shots of espresso- We used our Nespresso machine

  • Good vanilla ice cream

 Directions

  1. Chill pint glasses in the freezer for several hours. (optional)

  2. Brew one shot of espresso for each (2 total) and let cool slightly.

  3. Drizzle chocolate syrup on the inside of each glass.

  4. Scoop out 2-3 scoops of ice cream into each glass.

  5. Add one espresso shot to each.

  6. Top with Chocolate Stout.

  7. Enjoy!

Lavender Vanilla Bean Ice Cream

Lavender is one of our favorite flowers. We love the way it looks, we love how it smells, and we LOVE to eat anything with lavender. As kids, one of our favorite restaurants, Corkscrew Cafe in Carmel Valley, used to serve up the most delicious lavender ice cream for dessert. It was eventually taken off the menu (if you hear us, PLEASE bring it back!), but we never forgot the deliciously floral flavor of this dessert. Lavender is in full bloom in Carmel Valley right now, so we were reminded of our long lost favorite dessert and decided to try to make it ourselves! If we do say so, we think this even more delicious than the original. We added vanilla bean to complement the lavender, and we believe it is just perfect! The ice cream base is adapted from Jeni's Splendid Ice Cream recipe book. Eve went to undergrad in Ohio, where she first tasted flavors like roasted strawberry buttermilk and goat cheese and cherry ice cream. Jeni's ice cream base is unbelievably creamy. You won't be able to eat just one scoop!

xxx Ivy & Eve

We use the Cuisinart Classic Ice Cream Maker for our ice cream adventures. The machine is super easy, and there is no need for ice and salt like the old machines!

Makes one quart of ice cream.

Ingredients 

  • 2 cups whole milk

  • 1 tbsp plus 1 tsp cornstarch

  • 3 tbsp cream cheese, softened

  • 1/8 tsp fine sea salt

  • 1 1/4 cups heavy cream

  • 2/3 cup sugar

  • 2 tbsp light corn syrup

  • 1/2 vanilla bean

  • 2 heaping tbsp culinary lavender

Directions

  1. Combine 1 3/4 cup milk (minus 2 tbsp), 2/3 cup cream, 2 tbsp lavender, and 1/2 vanilla bean sliced open, into a saucepan. Bring to a boil over medium-high heat. remove from heat and let the mixture steep until the desired flavor. (you can steep the lavender in a cheesecloth or strain after this step if you want a smoother texture. We like the lavender left in)

  2. While waiting, mix the remaining 2 tablespoons milk with the cornstarch in a small bowl to make a smooth slurry.

  3. Then whisk the cream cheese and salt into the slurry until smooth.

  4. Fill a large bowl with ice water.

  5. Combine the lavender vanilla bean milk mixture with sugar and corn syrup in a 4-quart saucepan and bring it to a boil again for 4 minutes. Remove from the heat and gradually whisk in the cornstarch/cream cheese slurry. Bring the mixture back to a boil over medium-high heat and cook, stirring with a heatproof spatula, until slightly thickened, about 1 minute. Remove from the heat.

  6. Pour the mixture into a 1-gallon resealable plastic freezer bag and submerge the sealed bag in the ice bath. Let stand, adding more ice as necessary, until cold, about 30 minutes.

  7. Pour the ice cream base into the ice cream machine canister and process according to your ice cream maker's directions.

  8. Pack the ice cream into a storage container. Place the ice cream in the freezer until firm, at least 4 hours.

  9. Bon Appétit!

Raspberries Romanoff

Ever since we can remember, our Dad has been whipping up Raspberries Romanoff for dessert. We loved it when our Dad made this because it looked and sounded so fancy! Now that we are older, we are surprised how easy it is to make this delicious dessert!

xxx Ivy & Eve 

Serves two. 

Ingredients

  • 1/2 cup whipping cream

  • 1/2 cup (about 3 scoops) vanilla ice cream

  • 1 six-ounce carton of Raspberries

  • 1 tablespoon powdered sugar

  • 1 tablespoon Grand Marnier 

Directions

  1. Chill a mixing bowl in the freezer for at least 10 minutes. 

  2. Pour whipping cream into the chilled bowl and mix on high until it begins to thicken. 

  3. Add the sugar and mix till the cream starts creating peaks. 

  4. Gradually add the ice cream in small scoops. Mix until the ice cream is incorporated but still has chunks of ice cream (you want a bit of texture to your topping). 

  5. Finally, add the Grand Marnier and fold into the mixture. 

  6. Place half the raspberries into two serving glasses and the whipped topping on top. 

  7. Add a few raspberries and mint on top for garnish. 

  8. Enjoy!

TIP: If you like your dessert to have a bit more kick, add some more Grand Marnier! You can also mix it up and try it with strawberries, blueberries, or blackberries! 


The Mighty Cherry Margarita

In the spirit of Cinco de Mayo, we wanted to share one of our favorite margarita recipes! These cherry margaritas combine Ivy's need for sweetness and Eve's preference for fresh flavors. We like to make these when cherries are in season, and we can buy them at our local farmers market, but we have also used thawed frozen cherries with equally tasty results. These margs are perfect for warm summer days by the pool or at your next backyard bbq. ¡Salud!

xxx Ivy & Eve

Makes one cocktail.

Ingredients

  • 12 fresh sweet cherries, pitted

  • 1/4 cup tequila

  • 2 tbsp. fresh lime juice

  • 2 tbsp. blue agave syrup

  • 1 tbsp. Triple Sec

  • Sparkling water (optional)

  • 1 lime slice, for garnish

Directions

  1. Place cherries in a cocktail shaker (or whatever you have on hand) and muddle them with a muddler or a wooden spoon until they are mashed and juicy. 

  2. Add tequila, Triple Sec, lime juice, agave syrup, and ice.

  3. Cover cocktail shaker tightly and shake well. 

  4. Pour and filter into a glass of ice. 

  5. ¡Salud!

TIP: If you would like to add a bit of bubble to your marg (or you like a more mellow cocktail), add a splash or two of sparkling water (or bubbly, we won't tell!)

Chocolate Covered Strawberries for Mother's Day & Free Printable Card!

With Mother's Day just around the corner, Eve and I were toying with ideas of what to give our Mom this year. After some time thinking, we decided we would make her chocolate-covered strawberries. We always buy these yummy morsels when we spot them in cafes and chocolate shops but had never really attempted to make any ourselves. It was SO simple, not to mention affordable! We recommend pairing these with a bottle of bubbly, naturally. We also designed a cute card to go with them for your Mom, because she really is the sweetest! Download the full-size card (we made a mini one to fit better in the pictures) for FREE by subscribing HERE! If you already subscribe, don't worry. We will be sending it to you shortly. Cheers to all our sweet Mothers! 

xxx Ivy & Eve

Ingredients & Supplies

  • High-quality white & dark melting chocolate 

  • Strawberries

  • Sprinkles, Nuts, and anything you want to top them with (optional)

  • Baking sheet

  • Parchment paper

 Directions

  1. Place melting chocolate in a microwave-safe bowl (you can also melt on the stove if you have more time).

  2. Set the microwave to 30-second increments and stir until just melted.

  3. Place parchment paper on baking sheet

  4. Simply dip the strawberry in chocolate

  5. Top with sprinkles or whatever your heart desires

  6. Let cool and set in the refrigerator before serving (they are best eaten the day of or next day).

Your Mom will LOVE them, we promise!


Death by Chocolate Guinness Cake

Happy St. Patrick’s Day! This cake is perfect for celebrating everything Irish. It is equally ideal for any beer or chocolate lover's celebration. The first time Eve encountered this densely delicious cake was during a college bake-off in England! It is so good, two of her friends used this recipe for their cake entries. One taste, and it'll be hard not to eat the whole thing!

xxx Ivy & Eve

Adapted from Nigella Lawson's recipe in Feast.

Makes one 9-inch cake.

Ingredients

For the Cake

  • 1 cup Guinness

  • 1 cup butter (two sticks)

  • ¾ cup unsweetened cocoa

  • 2 cups superfine sugar

  • ⅔ cup sour cream

  • 2 large eggs

  • 1 tablespoon vanilla extract

  • 2 cups all-purpose flour

  • 2½ teaspoons baking powder

For the Frosting

  • ½ cup cream cheese

  • 1¼ cups powdered sugar

  • ½ cup heavy cream (or whipping cream)

  • Smashed malt balls (preferably Maltesers)

Directions

  1. Preheat the oven to 350F

  2. Line the bottom of a 9-inch springform pan with parchment, butter or pam the pan

  3. In a large saucepan, pour in the Guinness and butter, turn heat onto Med/Low until butter is melted

  4. While the butter is melting, in a large bowl, whisk the eggs, sour cream, and vanilla together

  5. Once melted, take off the stove and whisk in the sugar and cocoa powder

  6. Pour and whisk in the egg/sour cream/vanilla mixture

  7. Lastly, add the flour and baking powder and mix well to get the lumps out

  8. Pour the mixture into the lined and buttered pan and bake for 45-50 minutes, or until a toothpick inserted in the center comes out clean (the cake may wobble a little when you move it)

  9. Leave the cake to cool in the pan on a cooling rack. It will be a very moist cake.

  10. Once it's cool, take the cake out of the pan and place on a cake stand or plate

  11. To make the frosting, whip the cream cheese in an electric mixer until smooth, add the sifted powdered sugar, and lastly, add the cream and whip well.

  12. Frost the top of the cake (so it looks like the foam on the top of a pint!) and add the crushed malt balls as decoration!

  13. Sláinte!

image2.JPG


Mad for Madeleines

Ever since we were little, we have loved all things pretty and sweet. We entirely blame our dear Grammy G for this trait, as she was known to skip dinner in anticipation of the dessert! Ever since Eve began baking, she has always had a particular love for French sweets. Naturally, one of the first things she mastered was the madeleine. These little shell-shaped cookies are a perfect accompaniment for tea time, and we find they go perfectly with a glass of bubbly! We suggest pairing madeleines with a bright and crisp sparkling wine with citrusy notes and a hint of toasty flavors such as Gruet Brut and the spurge worthy Perrier-Jouet's Gand Brut

Be sure to download our printable recipe card!

xxx Ivy & Eve

Adapted from the Patisserie Lerch in Paris (sadly now closed) via Paris Sweets

Makes two dozen madeleines.

Ingredients

  • 1 1/2 cups all-purpose flour

  • 1 teaspoon double-acting baking powder

  • 4 large eggs, at room temperature

  • 1 cup sugar

  • Grated zest of 1 lemon

  • 4 teaspoons vanilla extract

  • 10 tablespoons (5 oz) unsalted butter, melted and cooled

Directions

  1. Using a mixer with the whisk attachment, beat the eggs and sugar together on medium-high speed until they thicken and lighten in color (around 3 minutes).

  2. While the eggs and sugar are beating, sift together the flour and baking powder in a bowl.

  3. Beat in the lemon zest and vanilla. Switch to a large rubber spatula and gently fold in the dry ingredients, followed by the melted butter.

  4. Cover the batter with plastic wrap, pressing the wrap against the surface to create an airtight seal, and chill for at least 3 hours. The longer it chills. the better. We keep ours in the fridge overnight. The chilling helps create the characteristic humps on the back of the cookies.

  5. When you are ready to bake the cookies, preheat the oven to 400 degrees F (200 degrees C).

  6. Generously butter it, dust the insides with flour and tap out the excess. If the pan is nonstick, better to be safe than sorry and butter and flour it. We use Pam for Baking whenever a recipe calls to butter and flour the pan. It’s so much easier and less messy and hasn’t failed us yet! Then place the pan on a baking sheet for easy transport to the oven. 

  7. Spoon the batter into the molds, filling them almost to the top. One heaping spoonful is about right. Don’t worry about smoothing the batter. It will even out as it bakes. 

  8. Bake large madeleines for 11 to 13 minutes, small ones for 8 to 10 minutes, or until the cookies are puffed and golden and spring back when touched.

  9. Remove the cookies by either rapping the pan against the counter (the madeleines should drop out) or gently running a knife around the edges of the cookies. Allow the madeleines to cool on a cooling rack.

  10. Sprinkle powdered sugar on top and serve warm or at room temperature.

  11. Enjoy!

Madeleines are best eaten the day they are made. Honestly, It is hard to wait until they are even cooled before devouring them! ENJOY!


Variations

  • Cut the vanilla in half and add 2 teaspoons of rose water. This reminds us of a fancy high tea!

  • Substitute the lemon zest for orange for a lively little kick.

  • We like to add a pinch or two of cinnamon and nutmeg to the batter in the winter.

Be sure to download our printable recipe card!